1 – The Five Finger Scale
This first piano exercise is quite simple. Start by placing the thumb of your right hand on the middle C. Then place your other fingers on the next white keys. Your fingers should be located as follows: the index finger on D, the middle finger on E, the ring finger on F and the little finger on G.
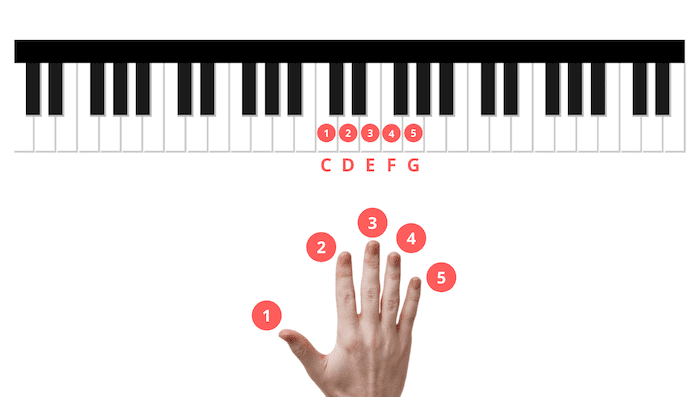
Now, you must play each piano note in turn, starting with C. You will go up your scale until you play the G with the little finger, then go down the scale using the same fingers until you reach the C with your thumb. Repeat the exercise by accelerating gradually, but playing with regularity.
This exercise will give you more dexterity in your movements so you can play easy piano songs with greater ease.
2 – Full scales
The full scale is a piano fingering exercise that is slightly more complicated than the previous one, because of what is called “thumb tuck”. This is a movement from which you will be able to continue moving up the notes of the scale by passing the thumb under the other fingers (usually under the index and middle fingers) and playing the next note with it. Usually this movement is used when we have to play scales higher than 5 notes in a row, in order to be able to keep moving up the scale as smoothly as possible. Pianote’s video shows how to perform a thumb tuck correctly:
Before practicing the full scale as a piano exercise, we recommend practicing thumb tuck on a 3- or 4-note series. Once you understand the movement, you can start practicing the full scale exercise.
To do so, position the thumb of your right hand on middle C, the index finger on D, and the middle finger on E. Play the 3 notes in a row. Then pass the thumb under the index and middle finger to play the F with it, while repositioning your other fingers on the next keys. Your fingers should now be placed as follows: thumb on F, index on G, middle finger on A, ring finger on B, and little finger on C. Now all you have to do is play the notes one by one with the right fingers. Use the Piano Pig video to help you do this exercise properly:
As usual, take it easy at first. Gradually increase the speed of your exercise as you feel comfortable. You can also use our article on the best piano practice techniques to help you progress. See also our article on the use of piano pedals which will help you smooth out your scales.
3 – The chords exercices
This exercise will train you on major 3-note chords. To begin, place your right hand thumb on middle C, middle finger on E, and little finger on G. For the left hand, place your little finger on the C of the scale below, your middle finger on the E, and your thumb on the G.
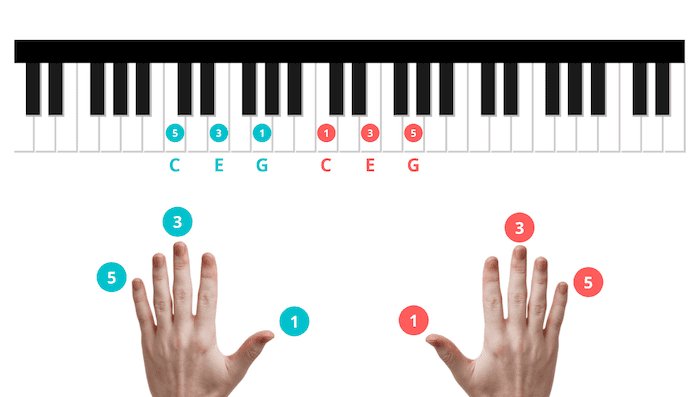
Now press all 6 notes at the same time. You have just made your C major chord with both hands. But let’s continue the exercise. Then you have to raise your 6 fingers one more note to make a D major chord. So you have to find yourself in the following position:
– your right hand: thumb on D, middle finger on F, and little finger on A.
– your left hand: the little finger on the D, the middle finger on the F, and the thumb on the A.
Now press all 6 notes at the same time. You have just made your D major chord with both hands.

Continue to raise all your fingers one note higher to make the following chords. Once arrived on the C chord, repeat the same exercise by going down one note between each chord.
As with all piano exercises, you should go slowly at the beginning, then gradually speed up.
The exercise is present on Pianote’s video tutorial. Watch it from 4:55 to follow the piano chord exercise:
4 – The broken chords exercise
This exercise is very similar to the previous one but will differ in that it does not play the chord notes at the same time, but one by one. For each chord, you will play the little finger of your left hand and the thumb of your right hand at the same time, then the middle finger of your left hand and the middle finger of your right hand, and finally the thumb of your left hand and the little finger of your right hand at the same time.
Once this sequence has been performed on one chord, you move on to the next chord. On a C scale for example, you will go up one note at a time to make all the chords of the scale by playing the keys one by one. Once on the C chord, you go back down. You can also use piano sheet music to do this exercise.
5 – The Warm-up exercises
This is a special exercise because it’s not done directly on the piano. It allows you to warm up before putting your hands on the piano. Liberty Park Music’s video explains in detail how to do a good warm-up before starting your piano session. It shows you the movements to stretch your shoulders, your head, your fingers, so that you can warm up your muscles and tendons and play longer:
6 – The hands independence
The independence of the hands is one of the most difficult piano exercises for beginners. Indeed, when we start playing piano, our brain is not used to doing two things at the same time: it works symmetrically. When the left hand produces something precise, it’s difficult to do anything else so precise with the right hand. In this respect, piano is one of the most complicated musical instruments for beginners.
But rest assured, there are exercises to help you improve your independence of the hands. By working on them, you will get your brain used to functioning asymmetrically and greatly improve your piano playing.
In this respect, the tutorial proposed by MangoldProject is very interesting. It helps you to dissociate your hands through an exercise that works on chord progressions on one hand and arpeggios on the other hand. Once you have mastered the exercise, you change the function of the hands: the hand that made the chords will make the arpeggios and vice versa.
Take the time to watch this video and practice this sequence to work on the independence of your hands:
7 – Contrary motion scales
Contrary motion scales are very interesting and powerful to train your dexterity and the independence of your hands on piano. It’s an exercise whose objective is to raise a scale with the right hand and to lower the same scale with the left hand.
To begin this exercise, you need to put your two thumbs on a common key on the piano.
Let’s take middle C for example. Put your two thumbs on this key.

With your right hand, you will, as in exercise 2 of this chapter (Full Scales), go up one note with each of your following fingers, doing the thumb tuck after your middle finger has pressed E to be able to finish your full scale.
With your left hand, you will do the same thing, but going down one note each time. As for your right hand, your left hand will do the thumb tuck after your middle finger has pressed the A to be able to finish your full scale.

Once you have finished the scale with both hands, you must go up the scale with your left hand and down the scale with your right hand. The goal is to return to the original position, with your two thumbs on middle C.
The Pianote video shows the movement to be performed to complete the exercise. Lean on this tutorial to reproduce the movement correctly:
As with all the piano exercises in this chapter, go slowly at first. Contrary motion scales are not easy to do for beginners. Take your time and gradually increase the speed to perform this movement.
8 – Hanon and Czerny piano exercises and techniques
When you start playing piano, you often feel clumsy with your fingers, and the 4th and 5th fingers seem a bit helpless. As with the hands, it’s also difficult to make each of your fingers independent when you’re playing. The methods designed by Hanon and Czerny make it possible to loosen your fingers and make your playing considerably more fluid. They also offer you exercises to strengthen your fingers so that you can play longer and more intensely.
The Hanon method is a very famous collection containing between 40 and 60 piano exercises, most of them focusing on the independence of your fingers. It will offer you many exercises around playing series of notes to strengthen your muscles and work on your fingering.

The exercises and studies of Carl Czerny, composer and pianist, are a little more difficult than those of Hanon. In his collections, the composer proposes exercises for the 5 fingers, scales, thumb tuck, alterations, intervals, … Czerny’s collections are very complete. However, be careful to take a collection for beginners, because his collections for advanced students are very difficult!